cooking is patience
cooking is love
cooking is work
cooking is fulfilling
cooking is frustration
cooking is failing
cooking is hair raising excitement
cooking is relaxing
cooking is pressure
cooking is repetitive
cooking is multitasking
cooking is organizing
cooking is cleaning
cooking is sharing
cooking is connecting
cooking is seasonal
cooking is respect
cooking is supporting your local farmers
cooking is not processed foods
cooking is not microwavable
cooking is nourishing
cooking is not eating factory farmed animals
cooking is knowing where your food comes from
cooking is pesticide free
cooking is fresh
cooking is not instant
cooking is teamwork
cooking is the smell of onions and garlic on your hands forever
cooking is on your mind constantly
cooking is three times a day
cooking is spontaneous
cooking is fun
cooking is rustic
cooking is innovative
cooking is science, math, history, and language
cooking is tradition
cooking is always learning
cooking is always teaching
cooking is being humble
cooking is simple
cooking is based on the day's weather
cooking is porcini mushroom and ricotta tortellini with sage brown butter.
Friday, August 21, 2009
Thursday, May 21, 2009
Sustenance and Sustainability
Since Jeremy requested that I add my two cents to this blog every once and a while, I have been thinking about what kinds of things I could write about. The problem is that our entire existence is based on food. Many of our social and ecological interactions with plant and animal communities revolve around eating. So what is there not to talk about?
Food is like a religion. We all have our own belief system. And some of us don’t really have an opinion at all, we just do what we need to do to get by and once the hunger pains are gone, we can go about the rest of our daily routines. The means to and end does not matter for those folks. And I believe there are a lot more people around without a belief system than there should be. In fact, I feel the crux of sustainability, whether you are talking about small scale sustainable farming or large scale sustainability of the human race, is our relationship with food. Or rather, our lack of connectedness.
Oh sure, we think a LOT about food, especially in our western culture. We think about (or are told to think about) how food makes us look, but not so much about how it makes us feel (any aches and pains after all must be derived from something else that only a pill is needed to cure), or how our eating affects any other living organism besides ourselves. We worry about parasites and deadly bacteria on our vegetables (which I personally think is an asinine and ironic thing to have to consider given that these organisms are normally associated with meat products), and for most people, cost is of great importance. Aside from that however, with our jam-packed days, the biggest hurdle is getting something, anything into our bodies and hope we don’t get fat or poisoned in the process.
What is wrong with this picture?!!!! Yes, yes, we’ve heard this all before. Of course we have. And luckily, as numerous social and environmental studies all scream the same results, the origin and quality of our food are finally starting to make segue into the mainstream public eye. These are the things I would like to talk about in future entries.
When I got home from work tonight, I was starving, as usual. And like almost every night I thought to myself “Man, I really don’t feel like cooking.” But there was no other option. Jeremy and I have minimized our purchase of processed (fast and easy meal) foods. We’ve narrowed it down to the occasional loaf of bread, a once in a while box of cereal, dried pasta, canned beans and tomatoes, tofu, some condiments and my one major guilty vice: chocolate). So I dug around the fridge, freezer and pantry in hopes that something fast, easy, tasty, and wouldn’t make me feel gross after eating it would jump out at me. Finally I decided to make a quinoa salad, which is about as easy as it gets (even easier would be without the quinoa): boil quinoa and cool, thinly slice cabbage, apple, celery and red onion, pan roast some walnuts (these were from my grandma’s orchard), combine all ingredients in a bowl, add salt pepper, olive oil and vinegar and bam! During this process, I really noticed how stunning the red cabbage was that I used. Yes, I believe vegetables can be beautiful and on a scale of 1-10, this one was a smokin’ 9.5! (I took .5 away for the awkward shape, which in this case was a practical hindrance to cutting.) It came from a friend’s organic garden and had a radiant magenta colour like I’ve rarely seen. And the red onion (that came from the another local garden) seemed much more vibrant and rich in colour than the ones we get from the store. A major disappointment surfaced when I realised my store-bought apple’s skin was probably laced with lots of pesticide (which is not only bad for my body, but would also kill beneficial insects including pollinators) that was sealed in with wax. And this is when I thought about our relationship with food. Mine has evolved immensely over time, as I believe happens to everyone based on his/her own experiences, needs and capabilities. But until everyone develops a relationship with food that allows them to not only know, but to also care about from where their food comes, how it was grown/raised/transported/stored, we will never be sustainable at any scale. And I promise you this, like every trophic cascade in a food web, where even top predators are limited by the production of what they eat, we too will become limited. In fact we already are [starving], ironically in the countries where we get a lot of what goes into our pantries and fruit bowls. So hopefully, even if you are currently one of these people who knows, cares and acts, this blog will become a forum for thought and discussion that will allow our relationships with one another and our food to progressively grow.
Tuesday, May 19, 2009
Lavender Honey Ice Cream, and other variations

I've made a lot of ice creams over the past summer. Some too rich, or not rich enough, some too soft (too much sugar or fat), or too hard (not enough sugar or fat), and some that were nice but a bit icy, which was most likely caused by the custard not being cold enough before getting churned in the machine.
So after trying out lots of different recipes I have settled on one that is perfect for my taste:
2 cups cream
2 cups milk
3/4 cup sugar
5-6 egg yolks (depending on size)
pinch of salt
Put the milk, cream and 1/2 cup of the sugar into a pot over a low flame. Stirring occasionally, heat the mixture until the sugar has dissolved, but don't allow it to boil.
In a bowl, the egg yolks are whisked with the remaining 1/4 cup of sugar until pale. While whisking constantly, pour a little of the hot milk mixture into the eggs to temper them, then slowly add the rest. Pour the egg and milk mixture back into the pot and add a pinch of salt. Over a very low heat and always stirring, cook the custard until it coats the back of your spoon. Be careful not to over cook at this stage or you will end up with the mixture curdling.
Strain the custard through a fine sieve into a clean bowl to remove any lumps. Put the bowl into a larger bowl filled with ice water and stir to cool it down quickly. Once it is cold, cover the bowl with cling film and put it in the fridge for a couple hours. Alternatively, you could cover the surface of the custard with cling film, so it doesn't form a skin, let it cool to room temperature and then put it in the fridge for 3-5 hours or overnight. In my experience, If the custard isn't very cold before being churned then the moisture trying to escape from the warm mix will freeze and turn into unwanted ice crystals.
Once the mixture is very cold, churn in an ice cream machine. I guess I'm supposed to say you should follow the instructions of your machine so I don't get blamed for you getting electrocuted or something.
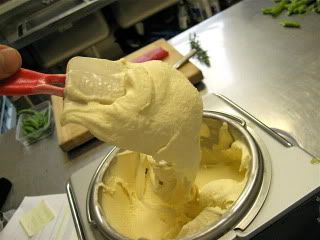
This recipe results in a soft and smooth ice cream that will remain scoop-able even after a few days in the freezer, while most of the recipes I tried went rock solid overnight. I have also started to add a pinch of salt to all my ice creams, it brings out the flavor a lot more. Next time you make an anglaise taste it before adding the salt and you will see what I mean.
Basic Vanilla Ice Cream: Warm a couple vanilla pods in the oven (not in the microwave because they explode, trust me, I have tried.), this helps release the natural oils and will also be easier to split and scrape the seeds. In a small bowl, add the seeds to the 1/2 cup of sugar and using your hands rub the two together. Not only does this separate the seeds from each other it infuses the sugar with vanilla and you get a tastier result in the end. Add the vanilla sugar and the scraped pods to the milk and heat to infuse as directed above.
Hazelnut Ice Cream: In my opinion, this was one of the best ice creams I made. Two cups of toasted and peeled hazelnuts get pureed in a food processor and then infused with the milk for at least 30 minutes, then strained out before adding the eggs. Simple.
Burnt Caramel Ice Cream: Another goody, this is made by adding the 1/2 cup of sugar to a pot and cooking over moderate high heat until it melts and turns a deep amber color. The pot is removed from heat and the cream is added. Be extremely careful here, the mixture can bubble and spit and a sugar burn is probably one of the worst, if not the worst of burns you could get. The idea is to mix in a bit of cream at a time and, back on the heat, stir until smooth. I learned the hard way that too much cold cream at once will make the sugar sieze up and solidify. After writing that out I just realised I should try heating the cream first (Duh! Well at least writing this blog has paid off for me already). After the all the cream is mixed in add the milk and stir until any solidified sugar dissolves again. Continue with the instructions listed above.
Lavender Honey Ice Cream (pictured at top): I steeped a tablespoon of dried lavender leaves in the hot milk mixture and replaced the sugar with an equal amount of honey. The result was really delicious, but maybe slightly overpowering on the lavender. I think I left the lavender in to steep a bit too long. I thought that when frozen the lavender would mellow out, but that didn't really happen. Next time I will taste the mix more frequently and strain it out when it is just right. I served this ice cream with sliced Mandarins, which are now in season here and eating beautifuly, and sugared pine nuts.
I haven't made too many fruit based ice creams, which are a bit trickier because depending on the sweetness of the fruit puree you have to adjust the level of sugar added to the custard base. I will have to play around with that next summer when the berries and stonefruit are back in season.
Saturday, May 16, 2009
Beet Root Cured Beef Carpaccio
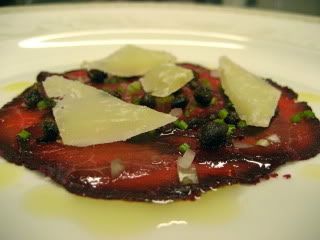
This was inspired by my friend James' awesome dish that he does with salmon. I just applied a similar beet root cure to a piece of beef fillet. I peeled five smallish beets and pureed them up in a food processor with a good splash of cabernet sauvignon vinegar, about 1/4 cup of lemon oil (regular extra virgin olive oil and the zest and juice of one lemon would probably work out fine as well), freshly grated black pepper, and a good couple pinches of salt. I put the puree into a bowl and, wearing gloves so my hands didn't turn pink from the beet root juice, rubbed the mixture into the piece of beef. I made sure it was completely coated in the puree and then covered the bowl with cling film and left it for 24 hours.
I was really pleased with the result. When I cut into the beef it had a beautiful dark purple stain around the outside and the flavor was really nice. I was slightly worried the beetroot would go bitter, or that the juice would stain too much to the center and I would lose the beef flavor altogether, but it was actually pretty perfectly balanced and the beet flavor was nice and sweet with a nice brightness from the vinegar.
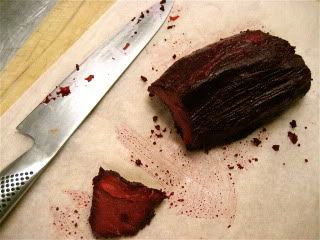
I wiped as much of the puree off the beef as I could, covered it in cling film and rolled it tightly into a log. I put this into the freezer about two hours before I was going to serve it, this helped to keep it's round shape without freezing it to the core.
To serve: I sliced the beef very thinly on a meat slicer (another way would be to slice by hand and then pound the meat thinner between two pieces of cling film) and arranged them on the plate in a circle. I brushed the beef with a lemon oil made here in New Zealand by Stone Valley, seasoned with salt and pepper, sprinkled the top with finely diced shallot, chopped parsley stalks (I am a new fan of parsley stalks, as long as they are from newer growth, they are crunchy and sweet), fried capers, and finally topped the dish with some shaved (also New Zealand made) sheep's milk Pecorino. Not only did this look extremely cool, it tasted awesome. I will definitely do this dish again.
Wednesday, May 13, 2009
Potato Gnocchi
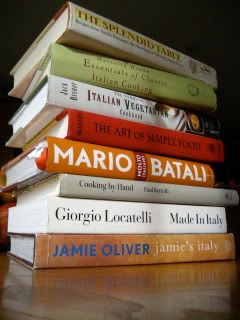
I started by pulling all the books off my shelf that I thought might have some good insight into gnocchi making. A few of them didn't have anything useful so they were out. Marcella Hazan's gnocchi only had flour and potato, and so did the recipe by Jack Bishop. Seemed like a very purist approach, but I found it interesting as the recipe we use at work contains eggs, parmesan, and nutmeg. It made me question whether the egg was necessary to bind the dough. I suppose if the potatoes were still hot and steaming when flour was added there would be plenty of moisture to bind it together... However, I do really like the added flavor from the parmesan and nutmeg so I thought I would keep them in my final recipe. Mario Batali's recipe seemed to beat the living hell out of the dough, which i thought would make the gnocchi way too tough. Both Paul Bertolli and Giorgio Locatelli's gnocchi recipes were incredibly detailed though also very different. Paul Bertolli's recipe had a small amount of cream in it, and I kinda liked that idea. Maybe the cream would soften the dough up enough for it to not go too hard and chewy?
The more I read recipes and instructions the more I realized there are a lot of different opinions on how to make gnocchi, though the ingredients in most recipes were very similar, the techniques were wildly different. Most say to use a floury starchy potato, but one recipe I came across said waxy ones were best. Some recipes boil the peeled potatoes, some say to leave the skin on, some said to bake, some to steam. It all started to become a bit confusing. I think it's just going to be one of those things that you have to make over and over again, like bread, and really get the feel for it. Cooking is all about personal preference, and there are about a hundred thousand different ways to skin a cat, right?
I settled on the quantity of potato, flour, and eggs from Giorgio Locatelli's recipe with the addition of cream suggested by Paul Bertolli. I also decided floury potatoes would be best and that I would boil them in their skins, thinking this would provide a truer potato flavor while also protecting them from absorbing too much water while cooking. I also took the advice of Jack Bishop and would finish them in the oven to really dry them out. I will admit that adding the cream to the recipe made me a little worried about too much moisture in the dough and visions of adding more and more flour to the dough and overworking it ran through my head. I wanted those babies dry as possible.
Final Gnocchi Recipe:
1 kg (2.2 pounds) floury potatoes, scrubbed
2 small eggs, whisked
1/4 cup cream
a good pinch of freshly grated nutmeg
1 1/2 tsp salt
320g (11.3 oz) all-purpose flour
1/4 cup grated parmigiano reggiano cheese
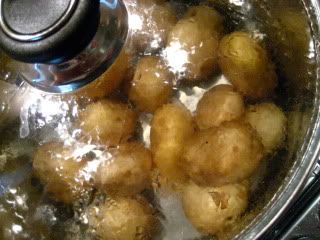
My good friend, Blake, had just recently sent me an awesome Brian Jonestown Massacre playlist, so I put that on full blast and then got to work. I started by pre-heating the oven to 200 degrees (400 fahrenheit) and putting the potatoes in a pot with cold, lightly salted water and then brought them to a boil. While they were boiling away I got all my other ingredients sorted and ready to go because once the potatoes were done I would need to work fast so they would stay warm. Once the potatoes were very tender i strained them and allowed them to cool down just enough so i could peel them. After peeling them I cut them into quarters, placed them on a baking tray, loosely covered them with foil, and stuck them in the oven. I wanted to get them really hot again as well as get out as much moisture as I could.
Once they were hot and dry I passed them through a fine sieve into a bowl. Using the back of a large spoon I smashed the potatoes through the sieve in small batches. This was quite a lot of work and I was really wishing I had a food mill (which every single recipes advised). I added the eggs, cream, salt, parmigiano-reggiano, and nutmeg to the potatoes and then mixed everything together. Then I poured the flour onto my clean work bench and made a well in the center. I put the potato mixture in the well and using a spatula (as I don't own a pastry scraper) I cut the flour into potatoes until it came together. Using the palms of my hands I gently pressed the dough together until it formed a soft smooth dough. I shaped it into a log and cut it into four equal pieces. Keeping the bench floured, I rolled each piece into ropes. I ended up cutting each rope in half again and placed them on a baking tray lined with parchment paper and dusted with flour to make sure they wouldn't stick. I put the tray in the fridge to let them rest and firm up a bit so that they would be easier to shape later.
While the dough took it's 30 minute nap in the fridge I had a much deserved beer.
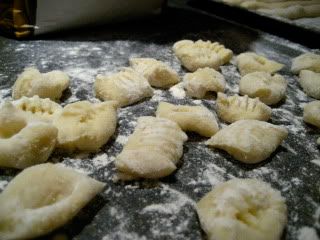
To shape the gnocchi i used a floured fork and snipped off little rectangles from the rope. Using the back of the fork, starting where the tines begin, I pressed my thumb into the little rectangle lightly while rolling it downwards and letting it drop off the end of the fork. This way you get little dimples in the back of each gnocchi and a nice pattern on the top. My first few looked pretty hideous, but I soon got the hang of it. Once they were all shaped they went back onto the floured baking tray and back in the fridge until I needed to cook them. I ended up with two trays of gnocchi, probably around 120 pieces. I set aside what I needed for the nights meal and froze the rest. Gnocchi really should be cooked within a couple hours of being made. They will oxidize and go gray over time.
So it was finally time to cook these bad boys and see how they turned out. I brought a pot full of salted water to the boil and dropped the gnocchi in. I turned the heat down to a simmer because boiling could make them fall apart. Once they float to the surface they are done. Using a slotted spoon i took them out and put them strait into my simmering tomato sauce and served them immediately with tuna meatballs (but that is a whole other story), fresh grated parmigiano-reggiano, and toasted walnuts.

So how were they? They were actually quite good. A lot better than I had expected to be perfectly honest. They were still a bit lighter than I had hoped, and next time I will add a touch more flour and maybe not be quite so gentle with the dough. I will have to try this again soon so the feel of the dough is fresh in my mind. I will say that it was a lot of hard work peeling the potatoes after they had been boiled, painstakingly pressing them through a sieve, and then shaping each one, but the end result is worth it. Cooking the potatoes in their skins added a really great earthy potato flavor that you wouldn't get had you peeled the potatoes first. This recipe is the definition of a labor of love.
Subscribe to:
Posts (Atom)